Blinking of LED :-
If you were a newbe to the world Arduino,then a question might stuct in your mind that How to start learning Arduino? What will be the first code that I can write as a beginner ?
If you are new comer,then LED blinking will be the best way to learn Arduino basics.
Materials needed :-
1} Arduino (I used a Uno here,but you can use any one)
2} LED
3} 330Ω resistor
4} Jumper wires
5} Solderless breadboard
Circuit Diagram:-
Remember that LEDs are polarised. That means that the positive lead of LED should be connected with the positive pin and ground lead should be connected with the neagtive pin.
In this setup, I choose pin 7 of the arduino to be positive(red wire) and gnd pin to be negative(black wire).
Arduino will provide a +5V to the LED. So resistor must be connected otherwise you will burn your LED.
Follow the schematic and connect the components.
The code :-
The important step is to code the arduino. The real miracle occurs here.This little board can be programmed in such a way that it can do anything you think.programming the arduino is quite simple.First you need to understand the basics.
Download arduino IDE from HERE.
Install it in your operating system.
After opening the software you will find like this :-
Every arduino needs void setup( ) and void loop( ) to work.
Once you reset,boot or power the arduino, the code within void setup( ) will be executed.It is used to initialize pin modes,variables,start using libraries,etc.Setup( ) function will run once after each reset or power up the arduino.
After the setup( ) function,loop( ) gets run over and over untill the power is removed.
In the void setup( ), write:-
int LED=7;
This gives the name 'LED' a interger value 7 . In the code, everytime we write 'LED' , arduino will interpret as 7.
Now arduino didn't know that we are using pin no. 7 as a output pin.In order to provide the information to the arduino,we write in the setup( ) section as :
pinMode(LED,OUTPUT);
You should understand that OUTPUT means giving electricity and INPUT means to take informations.
Now, a output may be ON(positive) or OFF(ground)
So, we declare "HIGH" means ON
"LOW" means OFF
In order to provide this information to the arduino, we write :
digitalWrite(LED,HIGH); //ON
digitalWrite(LED,LOW); //OFF
This code,we used "delay( )" function.Due to this,output is delayed.
If you write "delay(1000)"------output is delayed by 1 second.
This help us to blink the LED.
So the final code will be :-
int led=7;
void setup( )
{
pinMode(led,OUTPUT);
}
void loop( )
{
digitalWrite(led,HIGH);
delay(1000);
digitalWrite(led,LOW);
delay(1000);
}
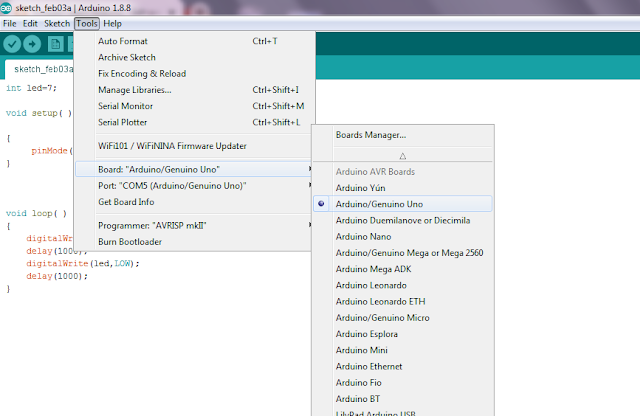
Now select proper board in the tools section.
And then select proper COM port in the arduino IDE.
And now upload the code.
Making upgraded version of LED blink :-
Once you finished up with the basic tutorial of Arduino i.e, Led blink, now you can try the upgraded version i.e, Multiple Led blink. I am showing you this tutorial step wise.
Materials needed :-
1) Arduino ( I used uno here, you can use any of the one ).
2) LED-3 pieces
3) 330 Ω resistor-3 pieces
4) Bread board
5) Jumper wires
Schematics :-
You should be note that LED are polarised. So only positive pin of LED should be connected to the pins 4,7,8. and negative pins to the ground(all black wire)., otherwise it will not glow.
The Code :-
int led1=4;
int led2=7;
int led3=8;
void setup( );
{
pinMode(led1,OUTPUT);
pinMode(led2,OUTPUT);
pinMode(led3,OUTPUT);
}
void loop( )
{
digitalWrite(led1,HIGH);
delay(200);
digitalWrite(led1,LOW);
delay(200);
digitalWrite(led2,HIGH);
delay(200);
digitalWrite(led2,LOW);
delay(200);
digitalWrite(led3,HIGH);
delay(200);
digitalWrite(led3,LOW);
}
Upoad the code to your arduino and have fun


No comments:
Post a Comment